A practical example of the three different types of Data Access Controls (DACs) in Datasphere
Introduction
The SAP documentation on the topic is quite extensive, so our aim today is to give you an example of how the actual implementation looks and to provide our recommendations.
Protecting your data with Data Access Controls
In SAP Datasphere, you can protect your data on a row-level basis via Data Access Controls (DACs). DACs make sure that users only see the data that they are authorized for.
The DAC is a “permission entity”, it defines for each user a set of criteria they are allowed to view. When applied to a view, the DAC will filter the results to show only the rows which meet the criteria for the current user. If you have a BW background, they may seem very similar to “Analysis Authorizations”.
Recommendations & Scope
SAP recommends that the data should be secured as soon as possible and to recreate the authorizations from the source systems where possible.
Analysis authorizations from BW can be imported and re-used with minimal effort, but this is a separate topic and will not be covered in this article.
We will focus solely on the three types of DACs you can create directly in Datasphere, which are:
- 1. Single Value
- 2. Operator and Value
- 3. Hierarchy
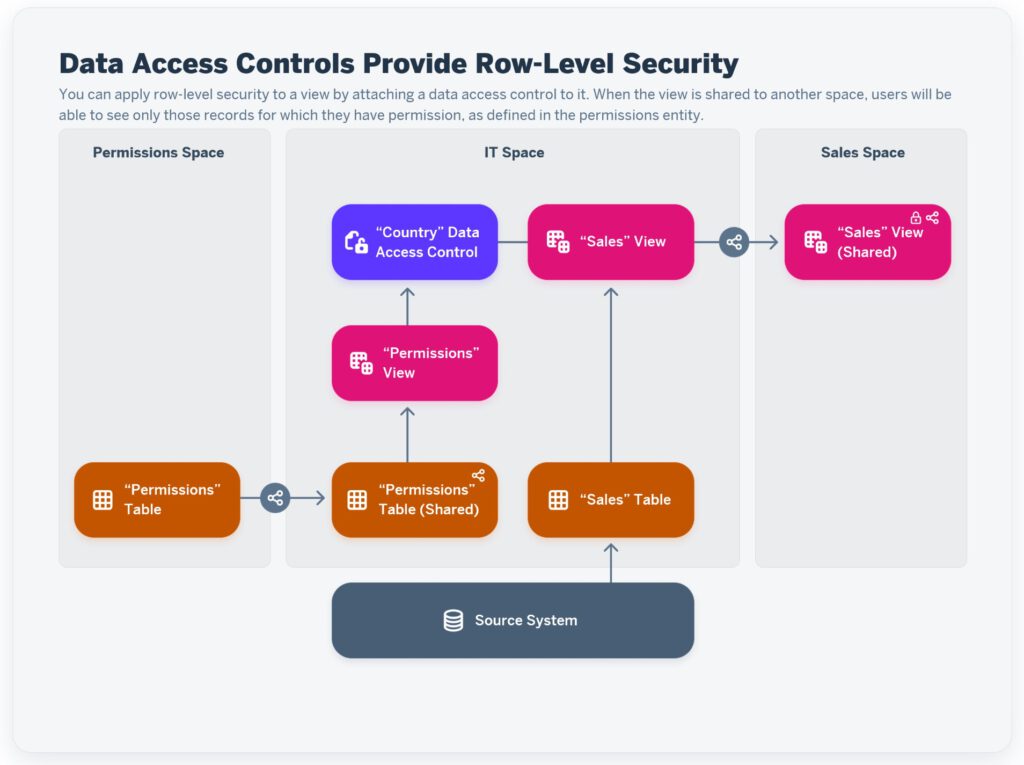
Setting up the Spaces (Architecture)
SAP recommends having three spaces:
- 1. In the “Permissions Space”, the table that defines the permissions to be stored. From here, the table is shared to an
- 2. “IT Space”, where the DACs are created and applied to the views. The views protected by the DACs are then shared with the
- 3. target Space “Sales” in the screenshot below where users can consume the data filtered by the DACs.
In our example, we have the following spaces in place:
|
SAP recommendation |
Our example |
| Permissions | Administration |
| IT Space | Sales Demo |
| Business Space (e.g. Sales Space) | N/A, we check the view directly in the preview of the IT Space |
The three types of DACs
1. Single Value
This was the first and prior to Q1 2024 the only DAC available in SAP Datasphere.
For this type, the permission table needs to have the following fields:
| Field | Meaning |
| User ID | Containing user ids in the format required by the identity provider (email addresses, logon names, or other identifiers) |
| One or more columns containing the filter criteria | The value of the filter criteria is put directly into the column and only single values are possible |
In our opinion, this type of DAC has been made obsolete by the introduction of the “Operator and Values” DAC, which is way more flexible and powerful.
2. Operator and Values
Introduced in Q1 2024, this DAC allows you to use operators like „>“, „<„, „=“, „>=“, or „<=“ to define groups of authorized values (ranges) rather than having to explicitly name every single value for which a user is authorized.
The permission table needs to have the following fields:
| Field | Meaning |
| Permission ID (optional) | Should be used as key |
| User ID | Containing user ids in the format required by the identity provider (email addresses, logon names, or other identifiers) |
| Restriction | OR / AND Operator: If the value in two lines is the same, it means AND, otherwise it means OR. |
| Criterion | Name of restricted characteristic, e.g. Country or Salesorg |
| Operator | See list of operators below |
| First Value | This value acts as the first argument or lower bound of the operator (in BW known as the low field) |
| Second Value | This value acts as the second argument or upper bound of the operator (in BW known as the high field) |
List of allowed operators (source):
-
- ALL (or *) – Provides access to all records. No values required.
-
- N (or IS NULL) – Is null. No values required.
-
- NN (or NOT NULL) – Is not null. No values required.
-
- EQ (or =) – Equal to First Value.
-
- NE (or <> or !=) – Not equal to First Value.
-
- GT (or >) – Greater than First Value.
-
- GE (or >=) – Greater than or equal to First Value.
-
- LT (or <) – Less than First Value.
-
- LE (or <=) – Less than or equal to First Value.
-
- CP (or LIKE) – Contains pattern First Value. Optionally Second Value can be set to an escape character.
See LIKE Predicate in the SAP HANA Platform documentation.
-
- BT (or BETWEEN) – Between First Value and Second Value.
This is the most powerful DAC and can easily cover most of the authorization needs we know from a BW environment.
3. Hierarchy
Also introduced in Q1 2024, this DAC allows you leverage the power of a parent-child hierarchy to authorize users. Not supported are Level-based hierarchies, dimensions with internal hierarchies, and entities with a semantic usage of Hierarchy with Directory.
For this type, the permission table needs to have the following fields:
| Field | Meaning |
| User ID | Containing user ids in the format required by the identity provider (email addresses, logon names, or other identifiers) |
| Exactly one column representing the content of the hierarchy, e.g. “Geo Authorization” in our example. | Contains the node value (parent or child) the user will authorized for. |
Our recommendation if the data you want to secure can be easily represented by a parent-child hierarchy which adheres to the following rules:
-
- A single root node with a parent value of null
-
- No nodes with multiple parents
-
- No circular relationships
Setup of the demo environment
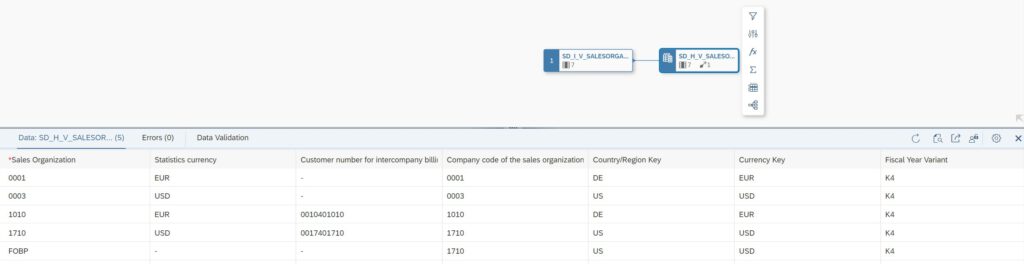
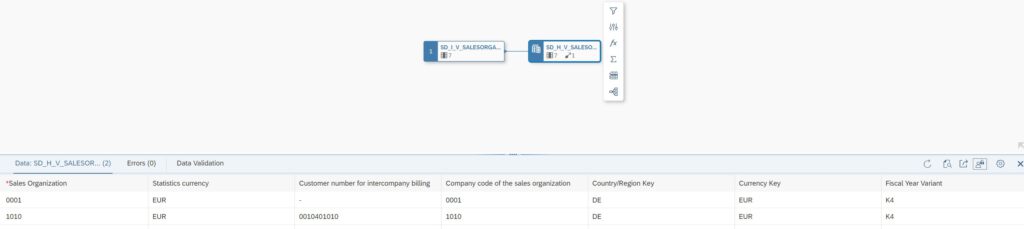
Let’s first have a look on the view we want to protect with the DACs (technical name SD_H_V_SALESORG_DAC_SECURED).
The view we want to protect has a column “Country/Region Key” (example Values: “DE” & “US”) and another column “Salesorg” (example values: 0001, 0003, 1010, 1710, FOBP, FORP).
In our examples we want to protect one or both of those values.

Now that we know which columns we want to protect, we can set up the DACs accordingly.
Depending on the type of DAC you want to create the table which holds the authorization values will look different.
First, we will create the tables in the “Permissions/Administration” Space, which hold the allowed values per User.
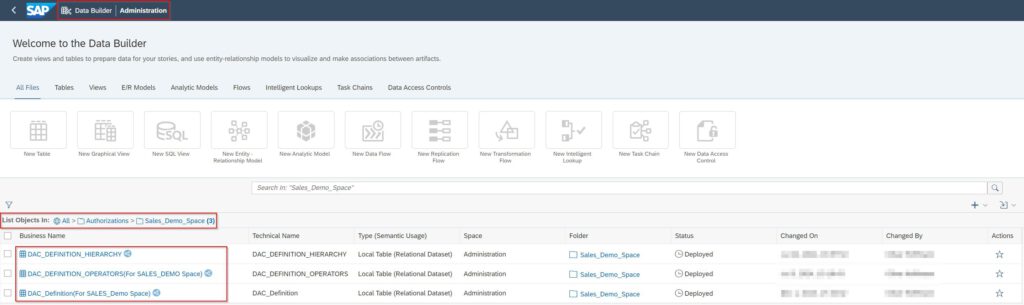
As you can see in the top, we are in the “Administration” Space.
In the middle you see the folder structure we created (Authorizations\Sales_Demo_Space) to know that the tables are used in the sales demo space. They could be used for other spaces as well but depending on the DAC Type the fields to be protected need to be in the target view (e.g. Salesorg does only make sense for a datamodel where it’s contained).
At the bottom the three tables are listed.
“DAC_Definition” holds the single values, the other two are self-explanatory.
We will first give a complete and very detailed walkthrough of how to create the Single Value DAC and then explain the other two types a little bit shorter.
Implementing the Single Value DAC
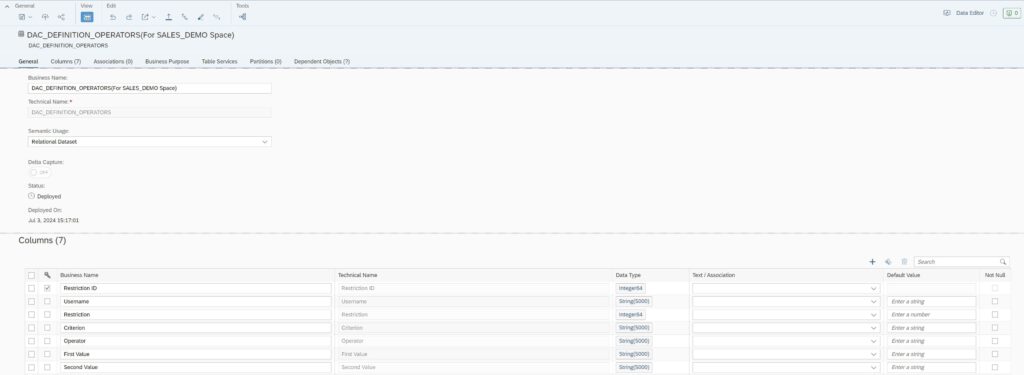
Let’s now see how the table for the single values should look:
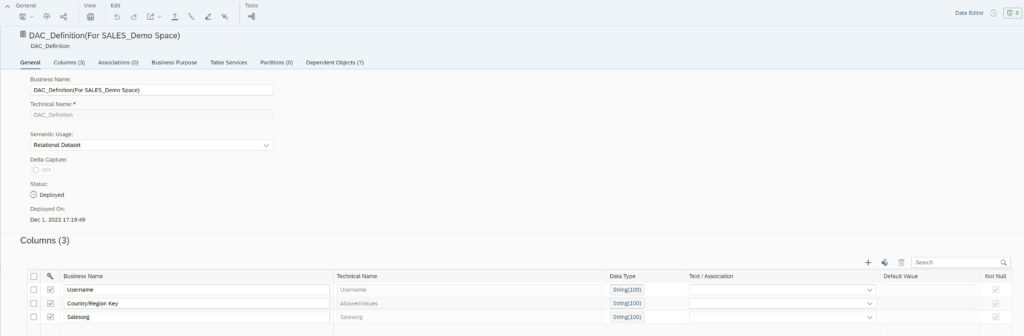
For the single values, we need three columns: Username, Country/Region Key, and Salesorg.
Once the table is created, we can upload values via a .csv file from our local machine by using the Upload button:

The content of the .csv for the single values in our example looks like this:
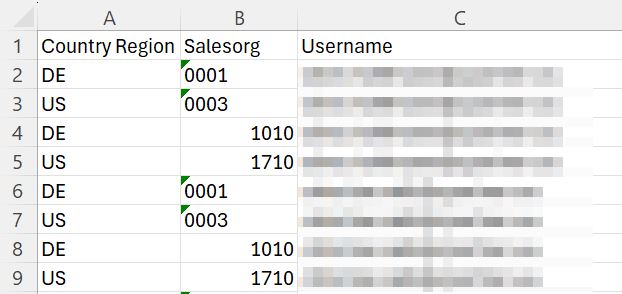
The first four lines belong to one User-ID, the following four to a second user. Both are authorized for the same values.
The columns of the .csv file do not even need to be in the correct order, as you can match them to the table columns during the upload process:

Now that we loaded the file, you can press the “Data viewer” button to see the values in this table at the bottom of the screen.

No surprises here, we now see the values from the .csv file in the datasphere table.

Sharing the table with the IT-Space
Now that we have created the permissions table and populated it, it’s time to share it with the IT-Space (in our example the SALES_DEMO space).
Click on the share button.

Then, select the IT space (In our example SALES_DEMO) and click on the “Share” button.
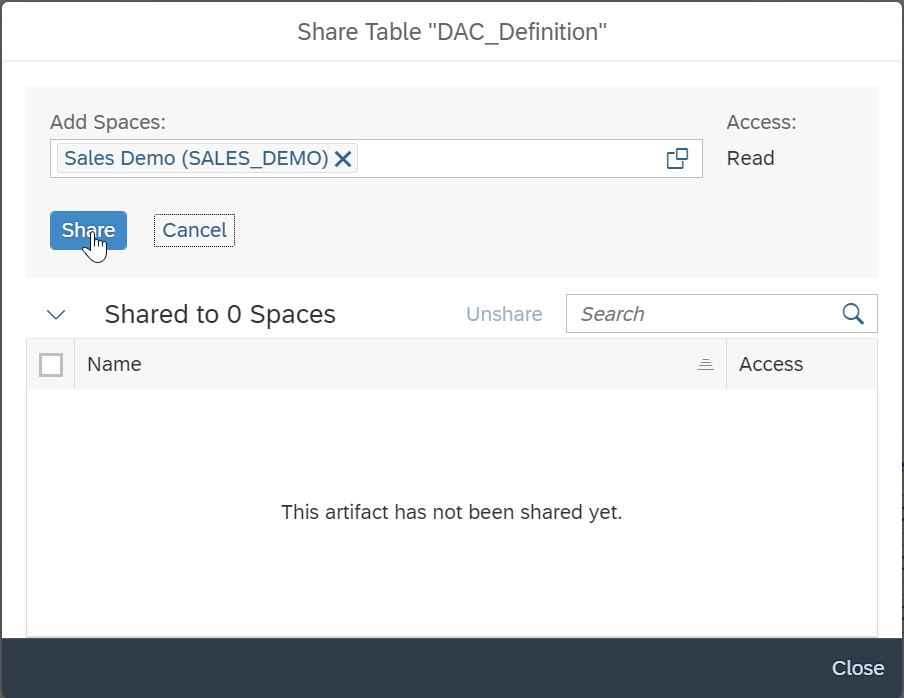
A popup “Model is shared” should appear at the bottom of the screen and we can navigate to the Sales Demo space in the Data Builder.
Until now, we have only shared the table with the IT space. In order to create DACs we first need to create a view on top of the shared table.
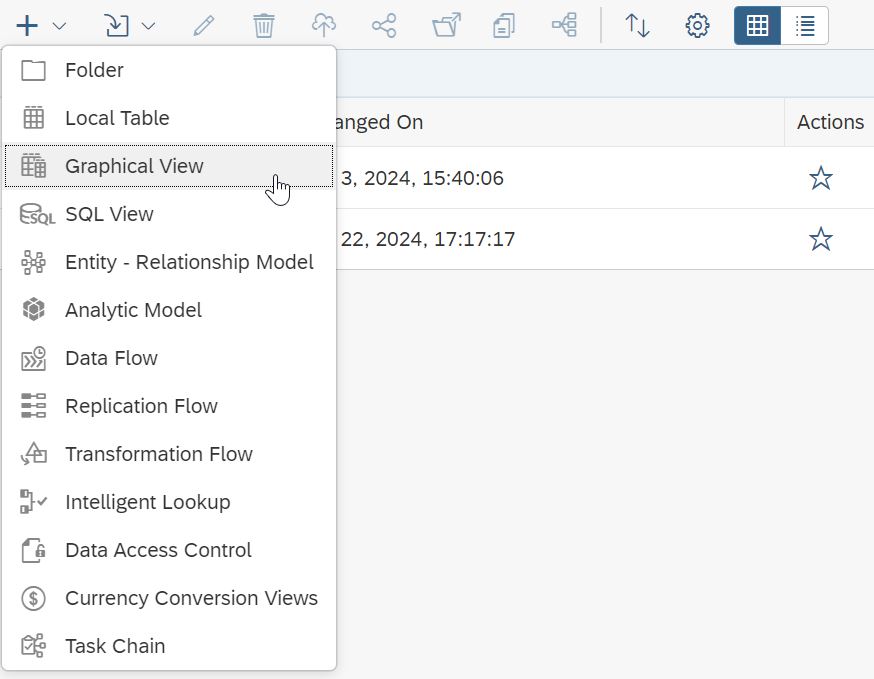
Creating a View on the shared table
Click on the tab “Views” and here on the “+” Button to open the dropdown menu. Click on “Graphical View”.
Now from the tree on the left side, we drag “DAC_Definition” onto the canvas.

On the right side, we enter as Business name: “DAC_SINGLEVALUE_VIEW_001 (View on Table shared from Admin Space)” and for the technical name we choose: “DAC_SINGLEVALUE_VIEW_001”
No further settings are needed, we can now hit “deploy”.
Creating the DAC
Finally, we are ready to create the DAC itself. In the Data Builder of Sales_Demo space, we click on “New Data Access Control”.

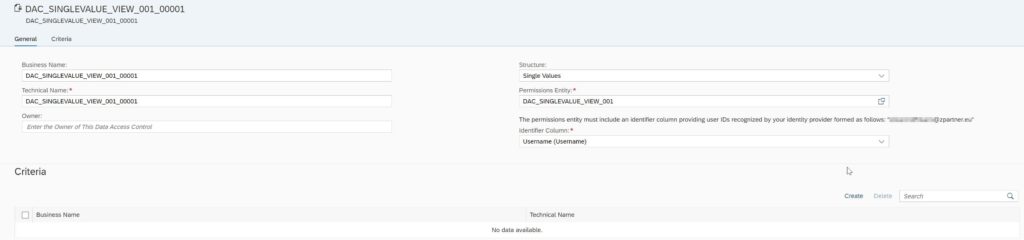
We select the same business and technical name: DAC_SINGLEVALUE_VIEW_001_00001.
The structure is “Single Values” and for the permissions entry we select the view we just created: “DAC_SINGLEVALUE_VIEW_001”. As the Identifier column we select the column which holds the User IDs, in our case “Username”.
Now we need to select the columns we want to restrict by clicking the “Create” button.
We add both and now can hit on “Deploy”.

Now the DAC creation is finished, and we can protect the target-view.
Applying the DAC to a view and checking the result
In the beginning we already showed how the target view (SD_H_V_SALESORG_DAC_SECURED) looks like.
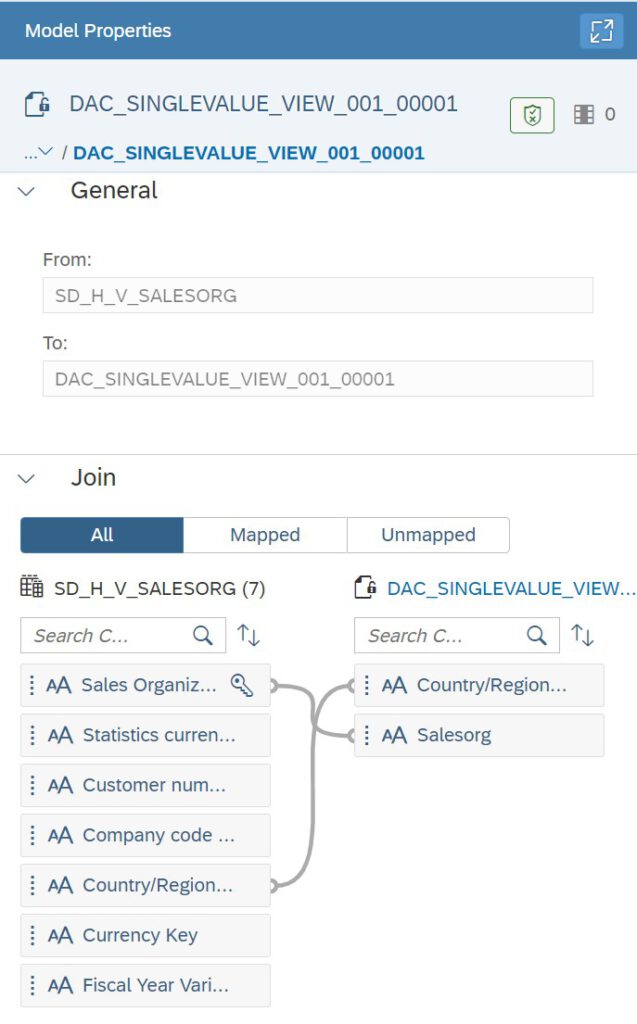
We now come back to it and apply the DAC. To do so, we open it in the Data Builder and on the right side of the screen in the Model details we scroll down to the bottom where we find “Data Access Controls” and click on the “+” symbol.
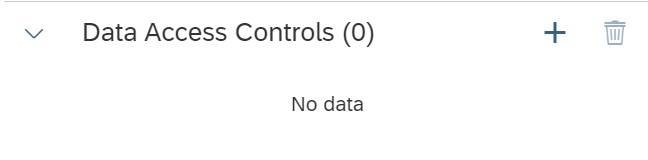
The existing DACs are shown and we select “DAC_SINGLEVALUE_VIEW_001_00001”. Now we need to map the fields of the DAC to the fields of the view by dragging them onto each other. Note that all fields from the DAC need to be mapped! After the mapping is complete, we deploy the view and our main work is finished.
Now that the target view is protected, we could share it with another space and then check the values for the users. To keep our example a little bit shorter, we can also use the data preview of the view.
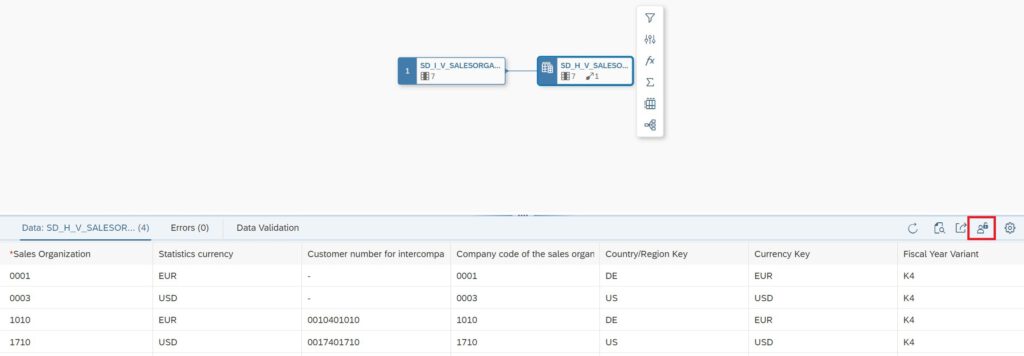
If you compare that to the content of the (unprotected) view shown earlier, and here once again for comparison, you will notice that the two Sales Organizations FOBP & FORP are not shown in the protected view (because they were not part of the .csv we uploaded).

Also note the red square in the upper screenshot. The function “View as user” allows you to view the data with the ID of another Datasphere user, so you can test if everything looks as expected.
Congratulations, you made it through the first example of creating a DAC and securing a view with it!
We will now continue with the other two types of DACs and tell you about their differences. The examples will be kept a lot shorter as most of the steps are the same and only differ in the number of columns etc.
Implementing the Operator and Values DAC
The table in Admin/Permission space for the operator and values DAC looks a little bit different, as it needs more columns. If you have BW Background this looks very similar to the “sign/option/high/low” combinations you might be used to.
The content of the .csv for the operator and values DAC in our example looks like this:
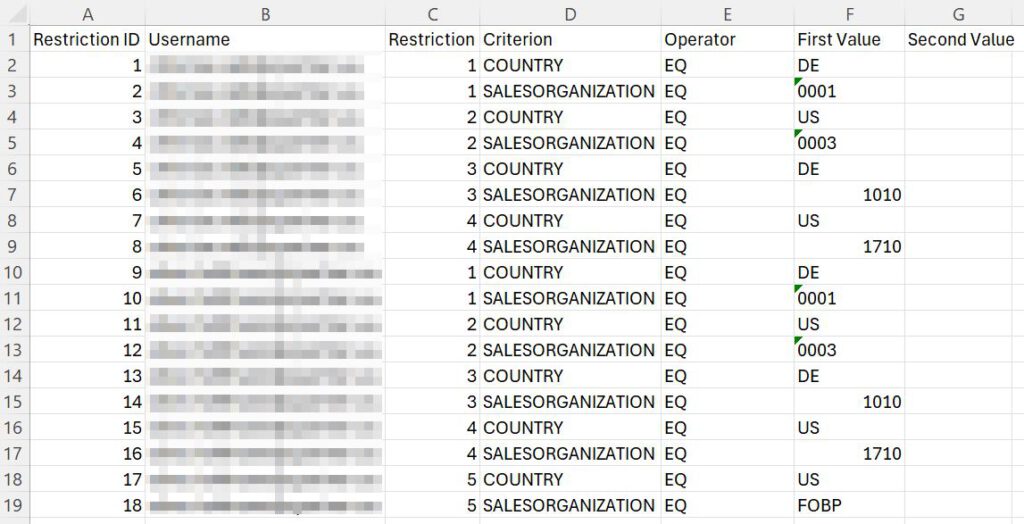
This file should give the users the exact same rights as in the single value example for the first user (Restriction IDs 1-8), plus we additionally added the combination of Country=US and Salesorg = FOBP for the second user (Restriction IDs 9-18).
The column “Restriction ID” can be seen like a counter and simply incremented.
The column “Restriction” acts as an OR / AND Operator: If the value in two lines is the same, it means AND, otherwise it means OR. In our example, we use it to bind the Country and Salesorganization restrictions together with an “AND”. Again, if you compare this to BW analysis authorizations, everything with the same restriction value (e.g. “1”) would be the content one analysis authorization.
The rest of the fields should be quite clear and were already explained above under “The three types of DACs”.
Let’s skip the intermediate steps of sharing this table with IT Space and creating a view on top, as everything is the same as in the previous example and let’s continue directly with:
Creating the DAC
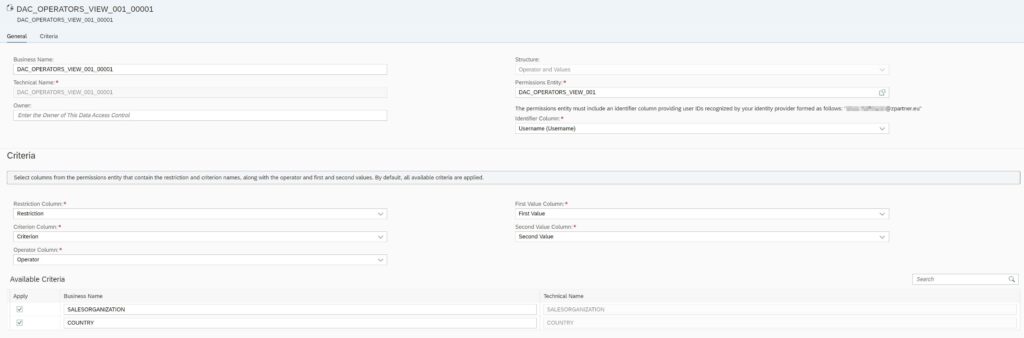
We select the same business and technical name: DAC_OPERATORS_VIEW_001_00001 and for the permissions entry we select the view we just created (not shown in this blog): “DAC_OPERATORS_VIEW_001”.
In the dropdown of “Structure” we select “Operator and Values”
Identifier is again the Username column and the main difference to the single value DAC is now the “Criteria” section, where we need to map the required columns to the columns of our view. As we already named the permissions table in the right way, we can now just map everything 1:1.
The part below with the “available criteria” will automatically show once we selected the “Criterion Column”. Here we can now select which criteria we want to use in our DAC.
Either we use both columns, or we could leave away one of the two. In the subsequent mapping between the view to be protected and the DAC we would then only map the remaining one.
In this example we will use both columns, can deploy the DAC and are again ready to protect our view.
It’s important that we first need to remove the Single Value DAC before we add the Operators and Value DAC!
The mapping again works and looks exactly like in the single value example, so we’ll skip it here and directly review the output:
As you can see, we now also see the data of Sales Organization “FOBP”, as we used the “second user” (Restriction IDs 9-18) to review the data.
You just saw the “Operator and Values” DAC in action, and we can now continue to the last one, the Hierarchy DAC.
Implementing the Hierarchy DAC
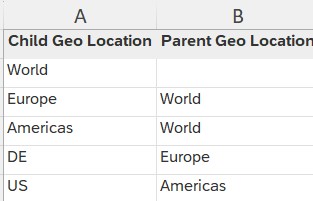
This type of DAC requires you to do some additional preparation work, namely creating the hierarchy on which you want to authorize the users.
We want to authorize our users based on the Country/Region Key that we already saw in the other implementation examples.
We prepare an Excel file which looks like this the one below and save it as a .csv file, so we can upload it to datasphere to serve as hierarchy for our DAC.
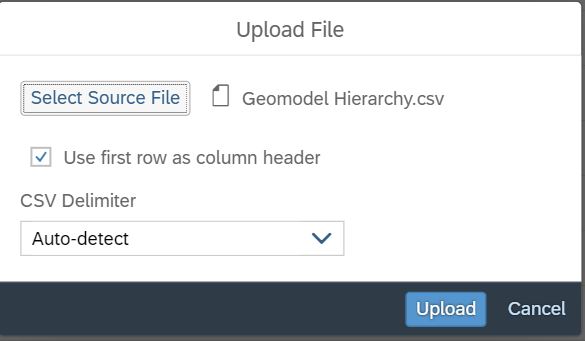
Then we load this .csv file to the Sales_Demo Space by using the “Import CSV File” functionality:
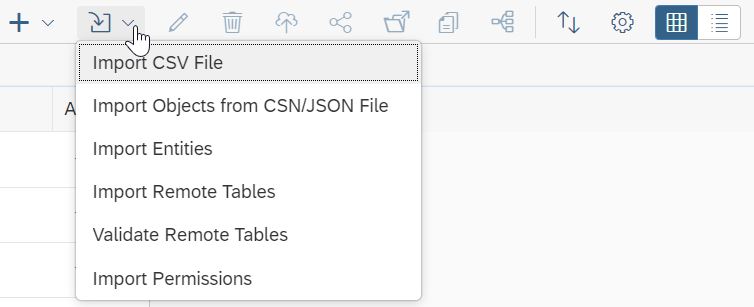
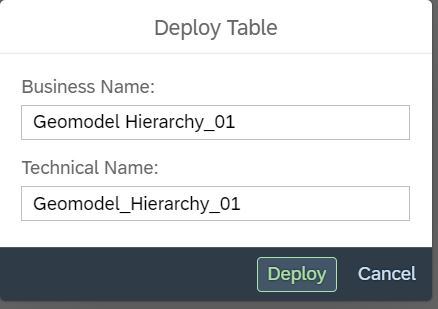
A popup will appear where we can leave everything as it is and click on “Upload”.
We will be prompted for the Name of the table which we state as “Geomodel_Hierarchy_01”
As soon as the table is deployed, we need to make some changes, so we open it.
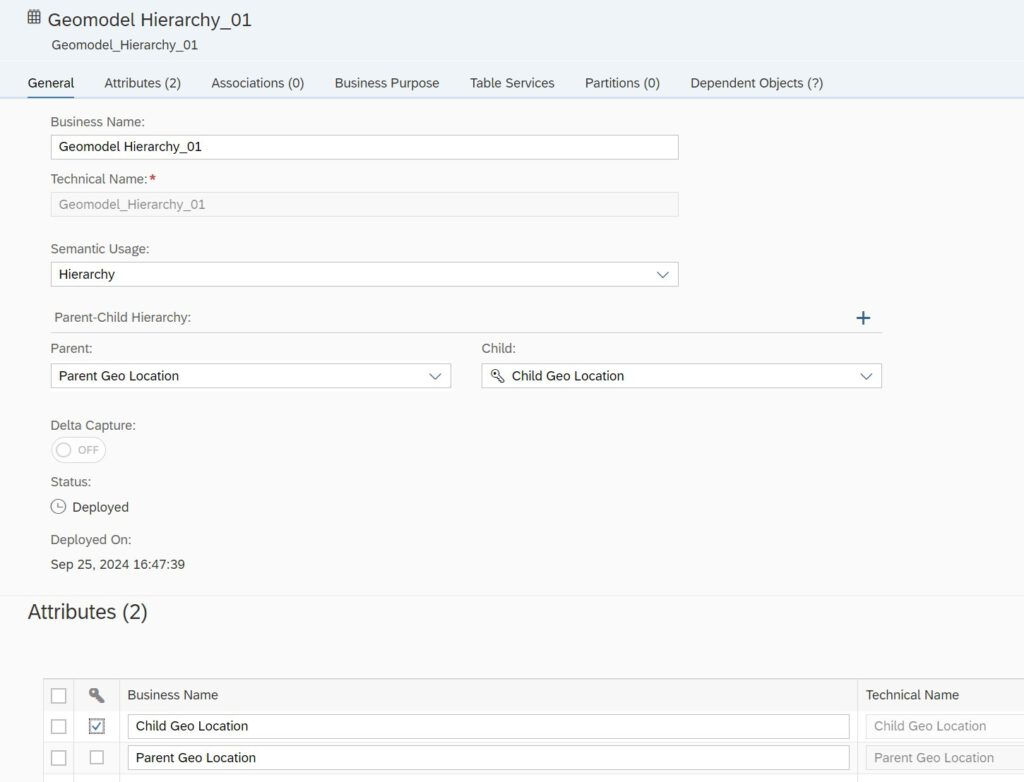
First, change the “Semantic Usage” to hierarchy. Now below the Parent-Child mapping will show up and should be already correctly pre-filled. Lastly, under “Attributes” mark the “Child Geo Location” as Key and we are done with the changes.
Now that we have created the hierarchy, we will again move through the well-known steps of creating a table in Admin/Permission space, populating it from a .csv file and sharing it to the IT-Space.
The table is the leanest of the three, as it only needs two columns: UserID & GeoAuthorization. Make sure to tick both of them as key.
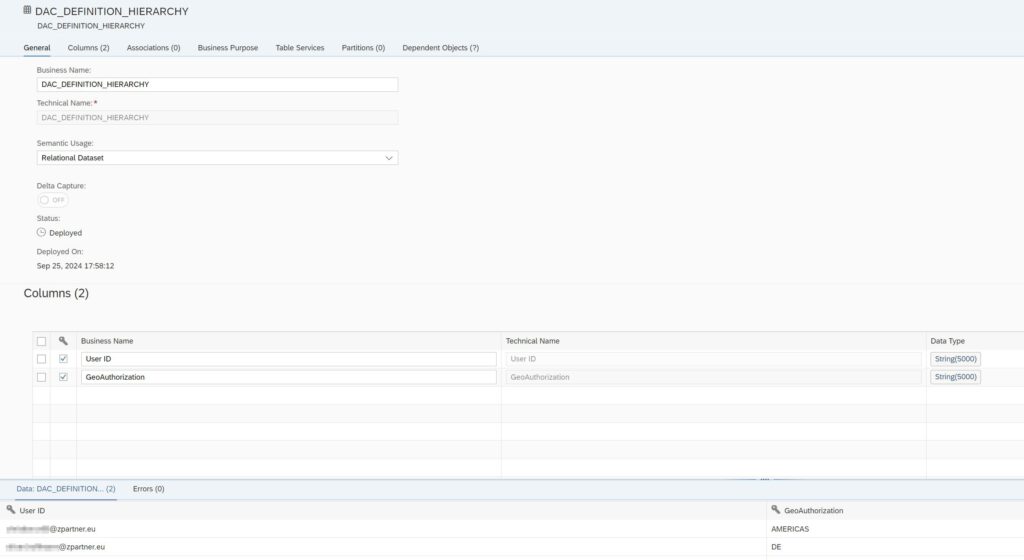
The content of the .csv is also quite minimal, we just state for which node in the hierarchy we want to authorize a User ID.

Let’s again skip the steps of the upload, sharing the table and creating the view and go directly into the IT Space (Sales_Demo) where we create the DAC.
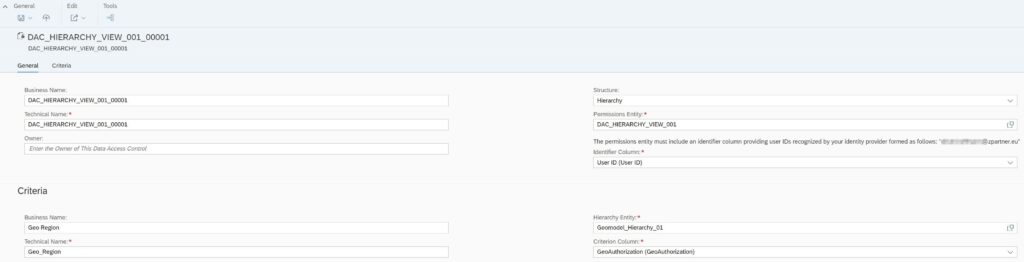
We will call the DAC “DAC_HIERARCHY_VIEW_001_00001”. As “Structure” we select “Hierarchy” and state the permission entity as DAC_HIERARCHY_VIEW_001 (creation not shown in the blog).
As usual, we map the User Id to the Identifier column and in the criteria we now need to select the hierarchy we created in the beginning of this chapter: “Geomodel_Hierarchy_01”.
Now select as criterion column the only remaining column “GeoAuthorization” and last but not least give a Business name (Geo Region) to the criteria (this is the name that shows up when you map the view to be protected with the DAC in the next step).
The mapping again works and looks exactly like in the single value example (except that we only need to map the “Geo Region”), so we’ll again skip it and directly review the output:
As you can see, the first user, which is only allowed for DE will only see the values with “DE” in the column “Country/Region Key”.
Now as we select “View as user” for the second user, we expect to see all values below the “AMERICAS” node, but instead we see nothing at all. This is, because the entries are case-sensitive. If we change the entry to “Americas”, then the user will see the data where Country/Region Key = US, because “US” is below “Americas” in the hierarchy we created in the beginning.

Hints & Key Takeaways
If you make changes to the permission tables in the Admin/Permission Space (e.g. changing key definitions) you will need to review and maybe also re-deploy objects further up in the dataflow (the views in IT-Space and the DACs)
If you only update the data in the permission tables, there is no need to check any objects, the DACs will work with the new values immediately.
If you run into troubles, there is currently no way to debug the result of the DACs. In BW you could use Transaction RSECADMIN to trace authorization issues for users.
Be careful with the case-sensitive behavior of DACs, as it might give you trouble as shown in the hierarchy example.
The Operator & Values DAC completely covers the functionality of the Single Value DAC and is more flexible, therefore you will not really need the Single Value DAC.
We recommend using either the Operator & Values or Hierarchy DAC, depending on your requirements.
Further reading
Useful source: SAP HELP
If you click on Download PDF on this page, a dropdown will open. Here you can select “Full Document” to get a copy of the PDF “Integrating Data and Managing Spaces in SAP Datasphere”. In Chapter 8 you will find “Securing Data with Data Access Controls”.

A practical example of Remote Authorizations in SAP Datasphere
A practical example of how remote authorizations work in SAP Datasphere. The SAP documentation on this topic is quite extensive, so our aim today is to provide a practical implementation example along with recommendations...
Continue Reading